Sunday, April 4, 2010


Friday, February 12, 2010
Chipping Away


Saturday, February 6, 2010
Excavation


Monday, February 1, 2010
Charlie Hall Bedstead
 Charlie
 Hall, son of Dr. James King and Fannie M. Hall, is one of approximately 83 children under the age of 15 buried in the First Presbyterian cemetery. It's amazing that 25% of the graves in this cemetery are children under the age of 15.
His bedstead will be the next that we will work on.
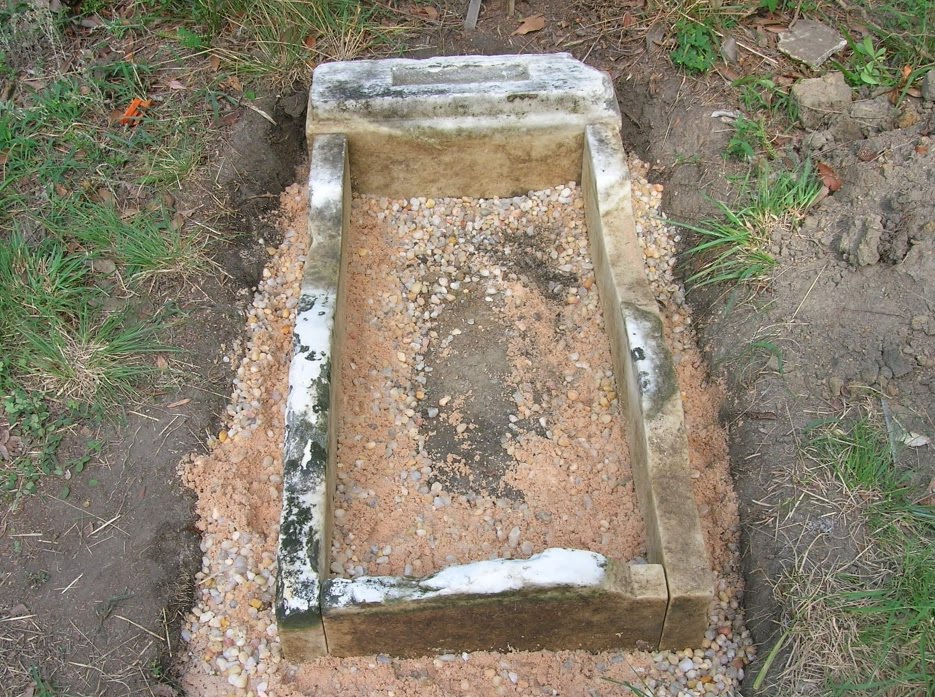
As you can see from the photo, the base, side rails, and foot rail have sunk. The headstone has been laid inside the bedstead and is encased in concrete. The mortise in the base has been filled with concrete, and the base is tilted
We will excavate the rails, foot rail, and base and raise and level them. We will also excavate the headstone and remove the concrete casing. The mortise in the base will be cleaned out in order to reset the headstone in the base.
Monday, December 21, 2009
Seymour P. Houston
 Seymour P. Houston
Complete
 The headstones were pinned, set, and allowed to dry.
Tuesday, November 24, 2009
Mounting the Headstones to the Mid-Base

Once the bedstead leveling and re-setting was complete, it was time to mount the headstones to the mid-base.
The pin location on the headstones were marked and drilled for insertion of the pins.
We use 3/8" threaded, stainless steel rods, 6 to 8 inches long with an equal amount in the stone and the base, to pin the stones. The stainless steel prevents rust and future damage to the stone. Nylon rods can also be used but we have found that stainless steel works best for us.
After the holes are drilled for the pins they are epoxied in and left for at least 48 hours to dry.

When the headstones are ready, the mid-base is drilled to accept the headstone pins and the headstone is lifted into place using a gantry (as shown here) or a tripod.
Care must be taken when drilling the mid-base to get the headstone in the correct position . Measure TWICE and drill once. Once the holes are drilled, you cannot change their position.
A dry fit to to make sure everything is correct is ALWAYS recommended. When everything is double checked for accuracy and approved, fill the holes in the mid-base with epoxy and lower the stone onto it. Check with an angle meter to be sure it is straight, support the stone to keep it from moving, and let it dry. Be sure to keep a check on it to make sure it isn't moving.
Sunday, November 8, 2009
Mid-base Replacement
 The mid-base of this bedstead was missing. It had probably become broken and was the reason the headstones were out and lying inside the bedstead.
We decided to purchase a new one to enable us to get the headstones back up and off the ground.
We decided on a Cherokee marble mid-base that has some grey streaks throughout the marble. While it does not match the bottom base perfectly, it should become less apparent once it gets weathered in and "dirties" up a little bit. This was deemed acceptable in order to get the headstones back up.

This photo shows the mid-base in position. The
headstones will be pinned, the mid-base will be drilled, and the stones will be attached to the mid-base in an upright position.
Monday, October 5, 2009
The David and Jane Scott Bedstead
 The bedstead of David (Oct. 31, 1797-Sept. 11, 1875) and Jane Scott (Jan. 29, 1809-July 15, 1880) was in pretty bad shape. The side rails were tilted and sunken with one broke, the mid base for the headstones was missing, and the headstones were laying inside the bedstead encased in concrete. The large bottom base was also tilted.
Dismantling began by moving the large bottom base off to the side.
The side rails and foot stones were removed and
 relocated to another part of the cemetery.
There we could repair the broken side rail while working to get the plot leveled before reinstalling the rails and foot stones.
 The headstones would have to be removed from the concrete carefully as both stones had been broken and repaired at an earlier time.
We now know that concrete around the stones like this is a "no no" but it was the best available at the time.
Sunday, November 30, 2008
Side Rails
 The side rails and foot stones were removed and relocated to another part of the cemetery for repair.
The headstones will be raised and leveled.
After repair, the side rails and foot stones will be replaced and re-set.
Monday, November 17, 2008
The Peyton Bedsteads
 Alexander M. (1838-1876) and Lottie E. (1845-1876) Peyton's bedsteads are the next ones we will work on.
As you can see from the picture, the headstones are leaning, the side rails are sunken and tilted, one side rail is broken, and Alexander's foot stone is broken and on the ground.
Lottie's bedstead rails have shifted and are now against the headstone in front of her plot.
The plans are for both headstones to be moved West about 12 inches to get Lottie's off of the stone in front of her's. Both headstones will be leveled and straightened. The side rails will be removed and the broken one repaired. The foot stones will also be removed and the broken one repaired.
Once the headstones are leveled and straightened, the side rails and foot stones will be re-set.
Saturday, November 15, 2008
Willis Plot Completed
 The Willis plot is now complete.
Thursday, November 13, 2008
Moving the Monuments
 Steve and Wayne are in the process of moving the Samuel Willis monument back and in alignment with the Ector monument.
This is a dangerous moment for the monument repair technicians. The monument must be lifted enough to get some "tracks" laid down for it to slide on. We used 2X4 boards for this one.
It is a slow and painstaking process.
You must lift the monument carefully to avoid leaning it too much from side to side or front to back. The ferrous metal pins used in the monuments are usually rusted and degraded enough that they break easily. This could do severe damage to the stone, not to mention the person that it could fall on. Some pieces are not pinned at all and are just sitting on top of the other pieces.
Once the monument is in the desired place, it is lifted again and the tracks removed. In this case, since we needed to raise the monument, we will put bricks under it for stability. Once the plot is back filled with soil, you will not be able to see the brick.
Louisa Willis monument is on the right and will be moved next.
Sunday, November 9, 2008
Re-set of the Coping Rails Complete
 The re-set of the coping rails is complete.
The task was completed using our pry bars, wedges, and a lot of muscle. We didn't have to bring in any additional equipment.
The foot stones were removed to prevent any damage to them, and the Indian Hawthorne bush was removed and relocated to another site in the cemetery.
 The next task at hand will be to move the two monuments back and align them with the Ector monument.
All three monuments will also have to be raised as we are going to bring in some soil and backfill the plot
Sunday, November 2, 2008
Excavation of the Coping Rails
 With the excavation of the coping rails comes a big surprise.
We expected them to be about the same size as the rails in the Long family plot. As it turns out, they are much larger and estimated to weigh 2500 to 3000 pounds.
In order to square the rails of the plot, the front rail will need to slide uphill about 8 inches.
Since the cemetery is surrounded by a brick wall with a couple of gates, we have no way to bring in any equipment to help lift the rails into position.
All the movement of the rails, ( squaring, leveling, and positioning ) will have to be done by hand. We will use our pry bars, wooden wedges, and large dowels to move them into place.
Friday, October 17, 2008
The Willis Plot
 The Willis plot, located to the South of the Logan plot, contains the graves of Louisa Willis 1829-1889, Samuel S. Willis 1810-1879, and Joseph T. Ector 1845-1872.
The plot contains three monuments, three foot stones, and three large granite coping rails. A large Indian Hawthorne bush is also in the plot and will be relocated.The coping rails are out of alignment, sunken, twisted, and unlevel.. Two of the foot stones are leaning and one is missing a big chunk and is cracked vertically, almost in half. Two of the monuments are sitting in the middle of the plot and leaning.
According to Dean Ruedrich, of Preservation North Carolina, who visited the cemetery and offered some tips and suggestions on our monument repairs, the plot was outlined with three coping rails. The three monuments should be aligned at the back of the plot to assimilate a back coping rail. These two monuments will be moved back and in alignment with the third monument.

Excavation and repair will begin soon.
Wednesday, October 8, 2008
Completing The Repair


Friday, October 3, 2008
Setting The Stones
 The lower sections of the stones are set into the concrete bases, leveled, and supported until they are dry.
The stones are set using a soft mortar compound designed to fail before damaging the stone. This way, should the mortar fail, the stone will not be damaged and can be reset in the same base.
Again, special care is taken to get the right stone in the base marking the correct grave.
 Once the lower sections were dry and workable, the top sections were mounted.
If needed the stones are pinned using a section of stainless steel threaded rod. The stainless steel will not rust. The ferrous metal pins used in the olden days would most times rust, swell, and cause fractures in the stones, eventually causing the stone to fail and end up on the ground. Or worse, break into several pieces.
We use a stone epoxy in addition to the rods to rejoin the pieces. The rods are epoxied in, a few dabs of epoxy is placed on the stone surface, and it is clamped into place until it is dry.
When dry, the clamps will be removed and, the crack in the stone where it is joined together will be in filled using a historic pointing mortar to keep the moisture out.

Tuesday, September 30, 2008
Constructing The Bases
 Soil was excavated from the grave plot and four base forms were constructed. The forms were placed, straightened, and leveled. The forms were placed so that they were 1 to 2 inches below soil level and the soil would cover them.
Some stones have bases that sit on top of the ground. These are tablet stones and do not have bases. Since the stones were broken and the lower portions could not be located and repaired, we wanted the bases underground to give the appearance that the stones were set in the ground.
 A mortise or slot had to be constructed in each base for the stone to sit in. This was accomplished using 1x2's, a piece of 2x4 and some duct tape to keep the concrete from sticking.
After the concrete was poured, it was checked often and the jig for the mortise was removed before the concrete was totally dry and it couldn't be removed.
This is a critical step. Let it dry too much and you can't get it out. Take it out when it's too wet and your mortise collapses and you have to start all over again.
 With the jigs removed, we will let the bases dry and then remove the forms from around them.
Then we can set the stones.
Friday, September 26, 2008
Raising and Leveling the Coping
 The gravestones were excavated and placed on a tarp to get them out of the way and to prevent any further damage. Care must be taken to ensure the stones are placed in the order that you excavate them so you can replace them in the correct order. The footstones were removed also.
All the stones will be replaced when the coping has been raised, leveled, and straightened and new bases have been constructed for the headstones.

Excavation of the coping was begun. The granite coping consisted of four corner posts and ten rail sections about
4 ft. long: two on each side and three across the front and back. The top and around 5 inches of each side was finished, with the bottom and the remainder of the sides being unfinished. The uneveness of the bottom made leveling the rails a little tricky.
String lines were pulled to ensure the corner posts were square. After the corner posts were squared, the rails were raised, leveled, and set according to the corner posts. We used a mixture of sand and pea gravel under the coping to raise and level it. We wet the sand and use a tamp bar to compact the mixture under the coping to ensure it doesn't move. The sand and gravel also promotes drainage.
In the photo on the right, the plot is ready for the bases to be built and the gravestones repaired and replaced.

The two side sections of the coping on the left was left out and a board was used to keep the soil from washing.
These two sections will be replaced when the large coping rails of the Willis plot next to it are raised and leveled. We needed to leave some working room between them.